


Its what every child dreams of a Tree house, and I thought it would be the perfect way to start educating my children about the joy of solar energy.
Project Summary: I planned to instal 2 x solar panels on the roof of the tree house, connected to a simple battery system and lights. The children would be able to activate the lights, and learn about how the solar panels were powering the lights. Using a smart solar charge controller, the system would detect daylight, and turn the lights off, and dusk to activate the lights automatically.
Start:
To start with I sized up the roof, and purchased 2 x Victron 40w 12V Panels. These have a PMAX of 2.1Amps, so in series I could expect +24V and 1-2 amps dependant on conditions. If wired in parallel, a maximum of 4.2amps at 12v.

The smaller sized Victron panels do not come with MC4 connections, I had originally understood that this meant no cables came with the unit, and I'd simply need to buy solar cables with MC4 ends to plug directly into the panel. This wasn't the case, the unit comes without any easily pluggable connectors, so it required me to remove the waterproof panel and make a physical connection with my 4mm solar cable.
*Note on any small panels check what connections they come with before buying the cables, which you may not need.

Here you can see the MC4 cable I purchased were not suitable.

I used a simple stripper tool to remove the double walled cable protection. This reveals the 4mm solar cable, which I was then able to insert into the gland. Note always remember to put the screw and cover onto the cable before preparing to fix, otherwise you'll have to start all over again.

A suitable crimping tool and end would of worked here, but I was also able to insert the cable and with a pair of pliers, just squeeze the ends to keep the cable safely in place.
I'd successfully wired up my first panel. I was going to run the panels in series, so the negative out from the first panel, was going to link to the second panels positive in. This mean I needed 3 lengths of cable between the panels and the solar charge controller. Wiring in series does help save cables and equipment as you don't need 2 sets of positive and negative strings in small setups like this. Its important when wiring in this way to ensure the solar controllers maximum input voltage isn't exceeded.
Educating my daughter about PV panels was important, so I made sure she fixed the brackets good and proper. For this application I used a simple Z bracket, which fixes to the panel using a nut and bolt, and then has 2 pre-drilled holes to fix to a variety of surfaces. I was going to use small timber screws to apply to the roof of the treehouse, so as to ensure I didn't perforate through the slats and cause a safety hazard.

Both panels, were wired, and I then set about fixing them to the roof, with a little help from my friend. Solar panels would always want to be mounted south facing where ever possible, to get the most energy from the sun during the afternoon at its peak point, however in this setup I had a south and north facing slope, so I decided to mount on both faces. Having both faces ensured I will capture morning and afternoon sun, which would be better than just having a single panel on the roof.

As part of the installation, I drilled holes into the timber roof, and fitted a waterproof casing, which would house the solar charge controller and all connections to ensure the setup was fully waterproofed and safe, especially with children in proximity.

Having successfully wired the panels, and fixed them to the roof it was time for testing, to before connecting my battery and solar charge controller. I planned to wire up a set of 12v lights that I'd found these seemed fun, and something I thought the kids would enjoy playing with.

The lights arrived, they were a series of 20 x 3V LED globes. The power rating on each globe was 0.064w, which is 1.28w in total for the 20.
Using the simple calculation Watts/Volts = Current, I was anticipating a current draw of 0.4amps. As you increase the voltage, the current is reduced (which is why larger scale setups always run on high voltages, to reduce the size and specification of all components involved, so at 12v my expected current would be around 0.1amps.

I connected the lights, and set the solar charge controller to automatic, the panels sensed no voltage due to the darkness and the lights were activated.

The current registered at -0.2A, which was higher than my calculations but still well within a suitable tolerance. This was an incredibly low power setup.
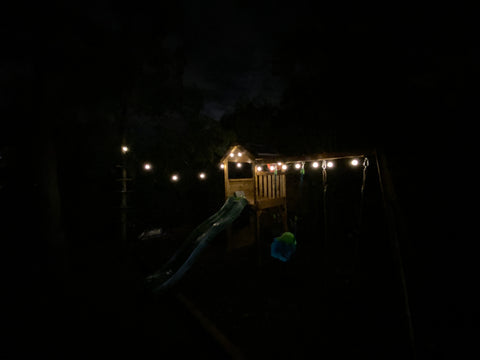
I set about stringing my lights up, and whilst the globes at (3V) each were not the brightest, they did the job of illuminating the area well.

I made some calculations based on the energy consumption and solar panel yields I expected. This was based on using a 24ah Lithium Ion battery, which I did intend to swap in the future for a lead based or AGM battery, as the Lithium battery was an over compensation for this rather basic setup.
My calculations showed below that I was able to add even more lights to the setup, and still have more energy each day, than was needed at night to power the solar lights.
| Power Consumption | Winter | Summer |
| Darkness | 5pm | 9pm |
| Daylight | 7am | 6am |
| Hours of Darkness | 14 Hours | 9 Hours |
| Hours of Daylight | 10 Hours | 15 Hours |
| Energy Consumed Per Hour | 0.3 Amps (12v) | 0.3 Amps (12v) |
| Total Energy Consumed Each Night (amps) | 4.2 | 2.7 |
| Nights of Power with a full battery without solar | 5 Nights | 9 Nights |
| Energy Generation | Winter | Summer |
| 1 x 12v 40W Panel - PMAX | 1amp | 2amps |
| Daylight Generation in amps | 8 amps | 24 amps |
| Watts | 96 | 288 |
| Consumption Each Night (W) | 50 | 32 |
| Daily Power Surplus (W) | 46 | 256 |
| Light Strings that could be added | 1 | 7 |

That was the end of my first solar powered tree house adventure. My system was ready in the future to add further power demands, such as a small inverter, to power any hand tools or gardening equipment needed in the local area.
If you have any questions about this setup, or would like some advice on your own setup you can reach out to us here
When doing this setup, I found it handy to have my all-in-1 solar system with me, it provided light, as well as a 300w power source, for when I was heat shrinking the cables. Quite a handy tool to have around the garden.

Happy Solaring !
