


Back in 2018, we were one of the first companies to put a solar panel onto of an EV van. The solar panels job was to give the on-board batteries an extra boost, to extend the hours of the on-board fridge, this was a big change, and normal ICE vans, run the fridge power off the motor.
We were excited to be given the keys to the new Maxus edeliver3, it promised greater range (up to 200 miles), with a reasonable price tag, as well as a well sized loading space.
The facts
The new maxus is made in China, you cannot help but notice the "Saic Motor" on the rear door, situated next to the Maxus name. China couldn't resist but to put their stamp on it.
Its a lightweight small commercial vehicle, plenty of space for all the gear, but there are a few draw backs as we quickly found out. If parked on a steep hill, there is no option to place the van into park, so if the hand break were to fail, you'd be in real trouble. If placing into F or R the van creeps, so this isn't a useful option either.

The next concern of ours is the build quality, the bonnet when opened can be lifted right off, as its just secured with 2 simple hooks, so in the event of an accident, its likely to come away from the vehicle entirely, and when coming to charge the van, to open and close the charging port, you need to knock the facia with some serious force, more of a punch than a push, this system needs looking at.
On the road the maxus is powerful, comfortable, but slightly noisy within the cabin, which is a repeated issue from earlier reviews of the prototype versions, that being said, its a commercial vehicle, so its not a huge drawback of ours.
The side sliding door and large 60/40 doors at the back are great, although the handles on all the doors feel incredibly basic, and may come away at any point after heavy use when on the road.
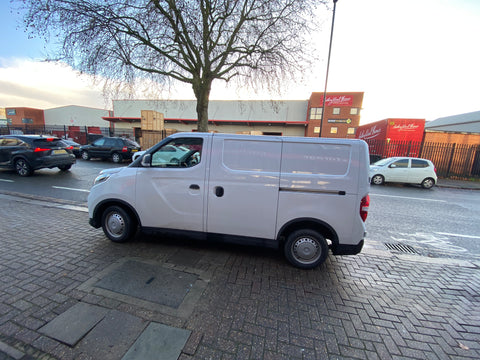
The charging system is good, although there is no feedback to the driver about how long is left to charge, this may prove frustrating if stopping for a break and quick re-charge, not knowing how long you've got until you can get going again.
Onto the positives, the 55kwh (long range) battery is a massive plus, its up to 200 miles which is more than enough for our needs each day.
Solar
As this van is ultimately going to be delivering food, it will be converted, with a food grade insulation inside and fitted with a fridge system and ancillary batteries to power the fridge. As such we've started sizing up for a solar panel on the roof, we've started looking at BIPVCO who do a really nice flush mounted flexible panel which we think would work really well.

We will continue to update this blog as the project progresses, however here is our skeleton plan for the electronic components and our calculations for sizing the fridge and systems.
----
Update February 2021
It's been a few months since we tested the Maxus, and pleased to say we went ahead and ordered 2 of them. They are currently being worked on in a workshop in the North of England, and as part of the build, NextDaySolar did the planning for the electric fridge and battery system to complement.
Here you can see the basic schematic overview of the vehicle.
Step 1 - We started off with a really basic sketch, to identify the key components for the kit.

Step 2
After the schematic was drawn, we searched for a better application online which included some of the components we were going to use in the vehicle. MS Visio is highly recommended, but we operate on MAC, so we found draw.io as a good solution. It was our first attempt, so please excuse the bent lines, but the most important aspect was to give the installers of the vans, an overview of the kit we were supplying to them.

Step 3
Next we set about detailing all of the items included within the system, working out cable gauges and similar. It was a basic system, but we wanted to add monitoring and 4g capabilities, so we can monitor the vehicle on the road at all times, and setup alerts and various commands if the SOC of the batteries would drop, we also wanted to know in realtime how much energy we would be harvesting from the panels on the roof.
| Batteries | MPPT Charger | PV Panels | Battery Monitor | System Monitoring | Bus Bars | DC - DC Converter | 4G Router | |
| Detail | Sized to load of Fridge | Sized to PV Panels | Sized to Available Roof Size | All negative loads wired via this unit | Connected to Internet | Sized to Max Current Requirements | For 4G Dongle Device | 4G Device to Serve Vehicle |
| QTY | 2 | 1 | 2 | 1 | 1 | 2 | 1 | 1 |
| Function | Energy Storage | DC to DC | Sunlight Capture | Monitor SOC | Realtime Monitoring to Web | DC Connections | 12V --> 24V | Wifi/LAN |
| Description | EcoTree EL12.8-216 | Victron 100/30 | BIPV F21F-115B1(56) MiPV 115w Module / Front J-Box E-W / 1381 x 674mm / SIKA |
BMV-712 Smart | Cerbo GX Device | Busbars | Orion 12/24-8 DC-DC converter IP20 | Rut240 |
| Available Size | CoolKit to Confirm | |||||||
| Part No. | SCC020030200 | BAM030712000 | BPP900450100 | VBB115040020 | ORI122408020 | RUT240 | ||
| Link | https://ecotreelithium.co.uk/product/12v-216ah/ | https://www.victronenergy.com/solar-charge-controllers/mppt-100-30 | https://bipvco.com | https://www.victronenergy.com/battery-monitors/bmv-712-smart | https://www.victronenergy.com/panel-systems-remote-monitoring/cerbo-gx | https://www.victronenergy.… | https://www.victronenergy.com/dc-dc-converters/orion-tr-dc-dc-converters-isolated | https://teltonika-networks.com/product/rut240/ |
| Wiring | Parallel | Series | From Orion DC | |||||
| Considerations | Cable length and runs must be balanced to bus bars to ensure equal paths of current from either battery | Open VOC of panels key consideration, which depends on available roof space | Fridge should be positioned so as to maximise available area for PV panels | 50mm visual display to be located in driver cab for driver feedback on battery SOC | Will include temperature sensors to monitor fridge and battery temperatures | 6.35mm Terminal Diameter/ 7mm connection | Wired of DC BUS | Ariels to be located in driver cab to gain cellular network |
| Appropriate Fusing | N/A but isolation fitted in-case van is in service and batteries are to be disconnected from system | 40A / 12V | 15A | |||||
| Min Cable Guage | 110A | 40A | 4mm Solar | 110A | 110A | 40A |
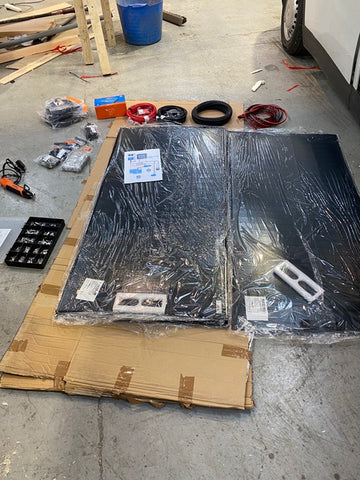
Now the design was complete, it was time to ship the parts up to the Van builder @ Coolvan and set to work.
Below you can see the 2 x 115W panels we have, along with the battery cabling, MPPT's and metal lugs we'd included for all the wiring.
Here we setup the panels side by side on the roof, to check for sizing, all fitted perfectly, and we even had a little extra room, for larger panels next time. These panels would be wired in series giving us up to 70V.

We had to decide on the battery location, it was really important for us to ensure the batteries were well balanced in the vehicle, had sufficient air flow, and didn't impede on the operational aspects of the vehicle. Whilst LDV are developing a DC to DC converter, so we could in the future access the main batteries of the van.
We settled on an L formation, as this ensured the batteries were not butted up against each other, ensuring under charge, the heat could be released from the batteries more efficiently.


